Cartridge Filters
OPERATION & TROUBLE SHOOTING
 Cartridge
filtration has been around for a long time, but it only recently has begun to
enjoy rapid growth and acceptance. This is due partly to the better quality
built into today's elements. Some earlier cartridge filters (and a few today)
had inferior quality elements, which are the heart of the design.
Cartridge
filtration has been around for a long time, but it only recently has begun to
enjoy rapid growth and acceptance. This is due partly to the better quality
built into today's elements. Some earlier cartridge filters (and a few today)
had inferior quality elements, which are the heart of the design.
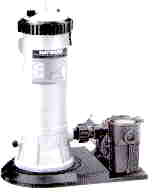
Cartridge filter shapes do not vary much. The single cylinder, with an easy
opening top for access and cartridge removal, is the most popular and convenient
design. Several manufactures utilize a cluster or grouping go two, four six or
eight smaller diameter tubes using smaller elements. Another design has a tank
that clamps to a base. Access to the elements in this filter requires that the
clamp be loosened to allow the entire filter body to be lifted off to expose the
internal parts for cleaning or servicing.
Whatever the shape, all cartridge filters are identical in how they clean water.
They are simple devices that trap dirt, lint, dust and pool debris as the water
passes through the pleats, flowing from the outside of the elements to a
collector standpipe, or core, and back to the pool return lines.
INITIAL STARTUP--
be sure the filter drain plug or cap is closed. Open the manual air vent valve a
few turns, and open the suction and return valves in your plumbing system, if
used. Be sure locking knobs or caps are secure...hand tight is sufficient. Prime
and start the pump, following the manufacturer's instructions. Air trapped in
the system will vent automatically to the pool and out the vent valve. Close
vent valve as soon as air is vented.
Filtration starts as soon as flow is steady through the filter. As the filter
cartridge removes dirt from the pool water, the accumulated dirt causes a
resistance to flow. As a result the gauge will rise and the return flow will
decrease. When the pressure rises 7 to 10 pounds above the starting pressure, or
when the flow decreases below desired rate, clean or replace the filter
cartridge or cartridges.
Remove the cartridge element(s) in the following manner.
- Shut off the pump.
- If the filter is located below water level close valves or block off suction and discharge lines to prevent backflow of water from the pool.
- Unscrew and remove drain plug from filter tank and allow to drain from filter. Close drain.
- Unscrew and remove locking knob (to lid).
- Carefully lift off top cover to gain access to filter cartridge.
- Lift out cartridge and clean, replace with clean spare cartridge.
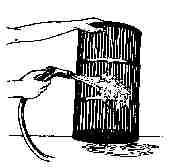
The cartridge filter element can be pressure washed inside and out with a
garden hose. Algae, suntan oil and body oils can form a coating on the cartridge
pleats that may not removed thoroughly by hosing. To remove such materials, soak
the cartridge in a solution of filter element cleaner. Tri-sodium-phosphate
(TSP) also is widely used with great success. Follow the manufacturer's
directions for use.
Hose the cartridge thoroughly before reinstalling in the filter. Remember the
chemical or cleaner you use will only loosen, or to a degree, dissolve the
grime, calcium, etc., on the cartridge. The jet action from a strong garden hose
must be used to clean thoroughly down into the bottom or deepest parts of the
pleats or folds.
If calcium or mineral deposits are excessive, the cartridge may be restored to
"like new" condition by soaking in muriatic acid. Use commercially
available 20o Baume muriatic acid added to water in a one to
one ratio.Use a plastic container, and take extreme care when handling cleaning
agents, because they can be harmful to eyes, skin, and clothing. After cleaning
flush with water.
A spare cartridge element is an excellent investment. It
provides convenience and assures that your filter will always be ready to
operate at peak efficiency.
Reinstalling Cartridge
- Clean any dirt or debris from the bottom of the filter housing with a garden hose.
- Carefully replace cartridge element over the tie rod and into the filter body, being sure that the cartridge seats evenly on the hub in the bottom of the filter body.
- place cover or caps on filter body. Be sure gasket or O-ring on dome is in place and lubricated with approved lubricant
- Tighten the locking knob or cap in a clockwise direction, hand tight only.
- Restart as per manufacturers instruction.
Cartridge Problems, Cures Most cartridge problems are caused by a dirty, clogged or abused element. Cleaning or replacing the element, as discussed earlier will correct these problems, with one exception: Oversized pumps, producing excessive flow rates and/or pressures may damage elements by flattening the pleats or folds; or breaking or splitting the end plates of the elements. Some cartridge filters have a valve device that allows some of the flow to bypass the filter cartridge when pressures are increased above normal. Check your owners manual to find out if you have one, and if there is any maintenance required or adjustments to be made.
Another possible complaint might be that a cartridge filter will not clean up algae. This is not true. Any of the three filter types will clear up algae, provided it is not in a live state. However, collecting algae is not one of the things that a cartridge filter does best. It takes longer for a cartridge filter to clear up an algae condition than sand or DE.
Cartridge filters are used widely as portable vacuuming systems and are a good choice for that job. Experience has shown that frequent cartridge cleaning or changing is necessary when cleaning up a dirty pool. Although it is possible to clean up very dirty pools through filtration, it is better, when possible, to vacuum heavy dirt to waste, then filter water until clean and polished.
LEISURE TIME TIP
Keep a spare cartridge and alternate their use,
allowing the cartridge to dry between use. The drying process seems allow the
cartridge material to breathe. Our experience shows that using this technique
seems to increase the life of the cartridges.