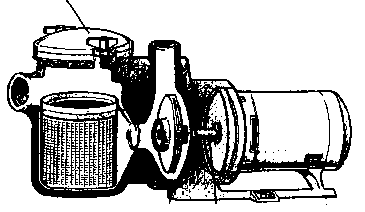
Pump
and Motor Trouble Shooting
Some of the following is intended
for information only. It is not intended to be used by anyone but a professional
with experience in repairing or trouble shooting electrical motors and other
electrical components.
Pump Runs,
But Pumps No Water
|
|
Most
Obvious |
|
- Check for dirty filter--High
pressure reading.
- Check for clogged or skimmer
basket--Low pressure reading.
- Check for closed valve
- Check for "Air Lock"
in suction line. (particularly if line is above pump level,
remove lid from strainer pot to relieve air.
- Water level too low (below
skimmers)
|
|
| If you have checked all
the above, fill pump housing and strainer pots with water and check to see
if it leaks down, than check (A) below. If it does not leak down, check
(B) below. |
|
| (A) Next
Check |
|
- Air suction leak-- Low or
pulsating pressure reading
| -Cracked
pipe on suction side. (Check all exposed pipes) |
|
| -Loose
fitting on suction side. (Check all exposed pipes) |
|
| -Bad
O-rings or gaskets on pump or traps. |
|
| -Cracked
pump or strainer housing |
|
| -Warped
cover on strainer housings |
|
|
|
| (B) If
Everything Above Appears Ok |
|
- Suction line could be clogged.
(Stick garden hose into suction line at pump strainer pot, pressure
blast debris if clogged.)
- Pump could be defective. Check
pump internally for any of the following:.
| -Clogged
impeller |
|
| -Badly worn
or broken impeller |
|
| -Check for
excessive wear on any wear rings or diffusers. |
|
|
|
| (C) If
Installation Is New |
|
- Total head of the plumbing
system is higher than the designed head of the pump
- A Check-Valve may be defective
or plumbed backwards.
- Suction-Lift required is more
than the pump can attain.
|
|
GENERAL
TIPS
Does pump sound different than normal? Could be air cavitation on the
suction side, caused by one or more of the symptoms above. Or, if the pump
sounds like its working hard the cause is usually back pressure from a
dirty filter.
Look for gray or white residue
from leaks around the pump indicating leaks from a seal or O-ring.
|
|
Pump
Runs, But Pumps Low Water Flow
|
|
Most
Obvious |
|
- Check for dirty filter--High
pressure reading.
- Check for clogged or skimmer
basket--Low pressure reading.
- Check for closed valve
- Check for "Air Lock"
in suction line. (particularly if line is above pump level,
remove lid from strainer pot to relieve air.
- Water level too low (below
skimmers)
|
|
| If you have checked all
the above, fill pump housing and strainer pots with water and check to see
if it leaks down, than check (A) below. If it does not leak down, check
(B) below. |
|
| (A)
Next Check |
|
- Air suction leak-- Low or
pulsating pressure reading
| -Cracked
pipe on suction side. (Check all exposed pipes) |
|
| -Loose
fitting on suction side. (Check all exposed pipes) |
|
| -Bad
O-rings or gaskets on pump or traps. |
|
| -Cracked
pump or strainer housing |
|
| -Warped
cover on strainer housings |
|
|
|
| (B) If
Everything Above Appears OK |
|
- Suction line could be clogged.
(Stick garden hose into suction line at pump strainer pot, pressure
blast debris if clogged.)
- Pump could be defective. Check
pump internally for any of the following:.
| -Clogged
impeller |
|
| -Badly worn
or broken impeller |
|
| -Check for
excessive wear on any wear rings or diffusers. |
|
|
|
| (C) If
Installation Is New |
|
- Total head of the plumbing
system is higher than the designed head of the pump
- A Check-Valve may be defective
or plumbed backwards.
- Suction-Lift required is more
than the pump can attain.
|
|
GENERAL
TIPS
Does pump sound different than normal? Could be air cavitation on the
suction side, caused by one or more of the symptoms above. Or, if the pump
sounds like its working hard the cause is usually back pressure from a
dirty filter.
Look for gray or white residue
from leaks around the pump indicating leaks from a seal or O-ring.
|
|
PUMP
RUNS, BUT NOISY
|
|
Isolate
Sounds |
|
| If sound is coming from
motor |
|
- Could be bad bearings
- Check for dirty or clogged
cooling fan (Openings or slots near front of motor)
- Could be a bent shaft (Could
have been dropped or sometimes they warp if overheated)
|
|
| If sound is coming from
the pump |
|
- Cavitation from low water flow
(see low water flow section above)
|
|
|
|
|
|
|
|
- Broken or bad mechanical seal
|
|
| Listen to the sounds
with a mechanics stethoscope or my favorite, a large long shafted
screwdriver. Place the metal end of the screwdriver on the object you want
to listen to, and the handle end in your ear. As you move the metal end
around you can hear the sound changes. CAUTION:
Don't get the listening device into moving or electrical parts. |
|
MOTOR
DOES NOT RUN
|
| CAUTION:
Some of the following procedures may require an electrician or a person
qualified for motor repair |
|
Most
Obvious |
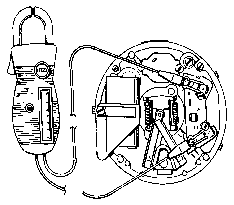 |
- Check to see if on/off switch
is on
|
|
|
- Check circuit breakers (Turn
off then back on)
|
- Is electricity actually getting
to terminals on motor.
|
| If electricity is not
getting to motor, you have an electrical problem, call electrician. |
| If electricity is
getting to terminals on motor proceed to the following |
| Next
Check |
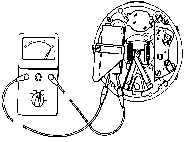
- Check voltage: (Caution:
should be done by an electrician)
|
| -Remove motor
end canopy |
|
| -Set meter for
nameplate voltage |
|
| -Put one lead
on L1 and the other lead on L2 |
|
|
|
- Voltage should be within 10% of
nameplate voltage
|
|
- If voltage is OK proceed to the
following
|
|
|
Caution
!!!!! Disconnect Power for next set of tests |
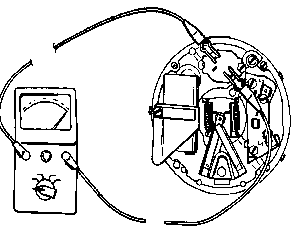
- Check Start-Capacitor (Not all
motors have one)Electric Disconnected
|
 |
| -Slip heavy
piece of paper between starter points |
|
| -Discharge
capacitor by touching the two leads with an insulated screwdriver.
Discarge capacitor each time you test. |
|
| -Set ohmeter to
R x 1K |
|
| -Atach one
probe to each lead of capacitor, meter needle should move rapidly
to right anad slowly move back to the left. (If using a digital
meter, readings should start low than rapidly increase to
maximum.) |
|
| -Replace
capacitor if bad. |
|
|
| Remember to
remove paper from between the points when finished. |
 |
| Next
Check |
- Check thermal protector-Electric
Disconnected
|
| -Set ohmeter
to R x 1 |
| -Resistance
between terminals 1 & 2 should be approximately 0 |
| -Resistance
between terminals 2 & 3 should be approximately 0 |
| -Replace if
either value exceeds 1 ohms |
|
| Next
Check |
|
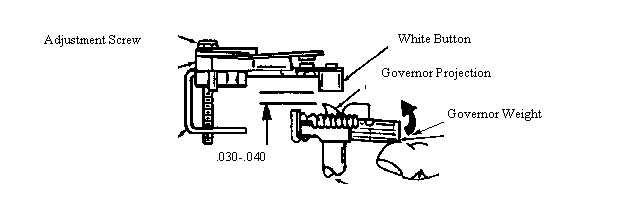
| Mechanical starter
switch check-Electric Disconnected |
|
|
|
|
| -Make sure
there are no obstructions preventing the proper operation of the
rotating governor. |
| -Check wiring
and make sure it is clear of the governor |
| -Check
governor and make sure weight flipper is free to move. |
|
|
|
|
|
| -Check switch
points for severely burned or pitted surfaces |
| -Visually
check the action of the points and the governor |
| -Points should
be closed with motor not running |
| -Reach in and
raise the governor weight until it touches the stops on the
governor. |
| -The clearance
between the projection on the governor and the white button on the
points should be .030" to .040" (about the thickness of
a paper clip wire) |
|
|
- Starter Switch adjustment
|
|
| -Turn the
adjustment screw until the correct clearance is reached |
|
|
| Next
Check |
|
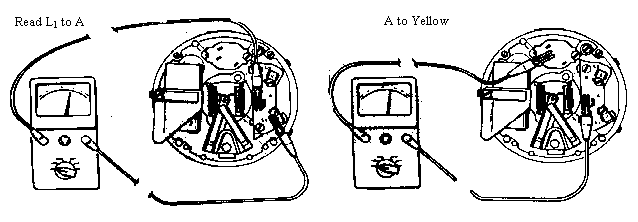
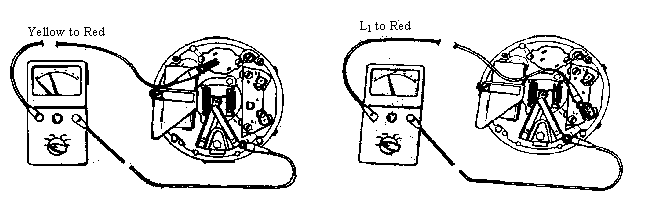
| Winding Continuity |
|
- The following procedures are
for a typical motor with the following specifications:
|
|
| -Single Phase |
| -dual voltage |
| -capacitor
start |
| -single speed |
| -terminal
board connected for 230V |
|
|
- To test for winding continuity
|
|
| -Set
ohmeter to R x 1K |
| -Slip paper
between the points |
| -Discharge
capacitor |
| -Take the
following readings |
- L1 to A------ &
------A to yellow
| -Resistance
should be the same |
- Yellow to
Red-------& ------L1 to Red
| -Resistance
should be the same |
|
|
|
| If reading
differ, check all leads and wires for breaks, loose connections, etc.,
which can be repaired. The problem could be an open or shorted winding, in
which case, the motor should be replaced. |
|
|